Angel Island Moorings, WTF?
The moorings in Ayala Cove, Angel Island are unlike any this author has seen elsewhere, they are NOT the typical
moorings with a messenger line and a long spreader line between hawsers (loops for bow and stern.) The intuitive
assumption is that one should use a dock line of a conventional length, and that the buoys' ground lines are of
sufficient length to work with that. This is not the case! Key point: if you are using anything more than very gentle
thrust and slow speeds, you are doing it wrong!
Many boaters, myself included, initially try to pull the buoys together with engine power -- it doesn't work!
Instead you must use a line long enough so that enough slack can be played out on one end, for your boat to reach
the other buoy.
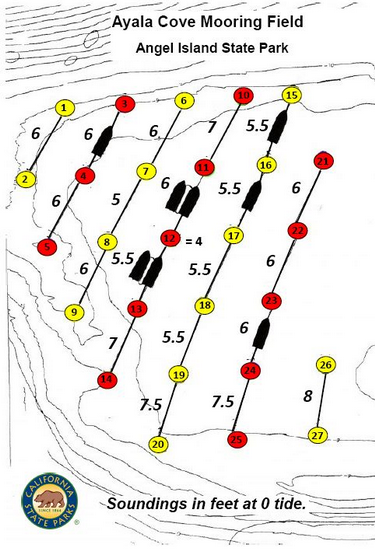
Basic Scheme
All boats must moor with bow pointing away from the island. The moorings are in a cove protected from the
prevailing winds though it is not uncommon for wind to shift and become the predominant force. Strategy is
dictated by the direction of the predominant force. Tidal currents in SF Bay must always be considered.
Step 0, in all cases, is to choose a suitable pair of mooring buoys, they should be the same color, situated in
deep enough water to accommodate your boat and clear of any boat that is improperly moored. Each mooring
buoy can accommodate two vessels, the bow of one and the stern of the other (not counting the buoys on the
ends of each string.)
When conditions are pushing your boat towards the island,
as happens during certain tidal phases and/or the wind is coming from a northerly direction,
the basic strategy is as follows.
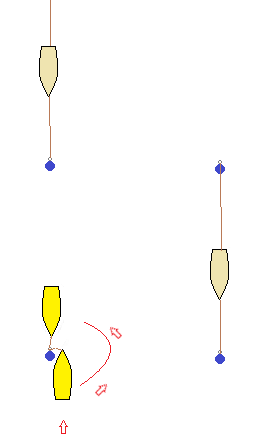
Step 1: Steer towards the mooring to which you will tie your bow,
the angle at which you approach it is inconsequential as the weather will orient your boat conveniently once
the bow is tied to the buoy. Proceed slowly and carefully until the buoy is close aboard, then pass a line
though the metal eye on top of it and tie the free end to a deck cleat. (More about making this line fast
is included below.) Often it's easiest to reach the buoy by coming along side of it. (A boat hook comes
in right handy here too.)
Step 2: Back towards the buoy to which you will tie your stern,
while playing out slack line on the bow, to accommodate the movement. Typically the bow line should have
very little tension when performing this step, though in heavy conditions it may need some to keep your
boat positioned safely. If necessary use a half-wrap around a deck cleat to control the line and keep it from
being pulled from your hands
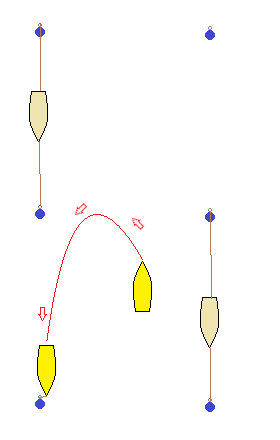
Step 3: When you reach the stern buoy, pass another line through its eye, then
pull on the bow line (taking in some of the slack played out in step 2) while playing out line on the stern. Alternatively
engine power may be used to position the boat while line is being adjusted, provided sufficient care is taken to
avoid fouling your propeller with either line.
The goal is to position your boat roughly between the buoys, with lines
taught enough to keep your boat in line with your mooring buoys. If you do not leave enough distance from
either buoy, you will make it difficult for other boats to use that buoy, possibly risking damage to either
or both boats if anyone tries, and difficult for yourself when you drop the mooring (if another boat also uses one.)
Step 1
Step 1 alternative
(depending on conditions)
Step 2
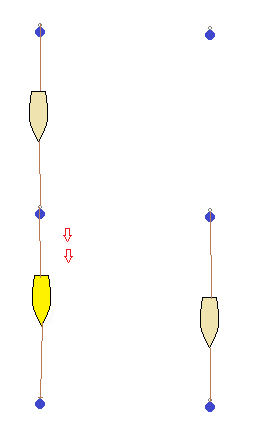
Step 3
Tying to the mooring buoys/making the lines fast
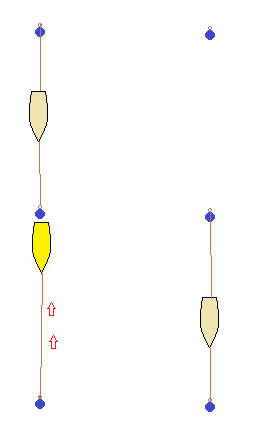
Many boaters tie the free end that has been passed through the buoy's eye to a deck cleat, and play out line on the
other side of the eye, effectively requiring a line that is twice distance to the buoy. The benefit of this is it makes
dropping the mooring very easy in slack conditions, just uncleat the lines, haul them in and off you go. The danger
is you are at the mercy of the elements until you get two very long lines out of the water.
If your lines are not long enough to do that, an alternative is to play out enough line until you are about 20-25' from
the buoy, then tie a bowline in the line, leaving double line (the loop of the bowline) only to that point. This leaves a
safe distance between you and the buoy when you later untie the bowline to drop the mooring. Play out
the working end of that line until you reach the other buoy.
Weather considerations when using a bowline:
In strong winds and/or current, tying a bowline quickly enough to maintain safe distance, and also before forces
on the line make the knot impossible to tie, can be a daunting task. I abandoned plans to moor there one trip,
after having paid for the night, because conditions were sweeping us into the other boats, and I didn't think we could
do it safely.
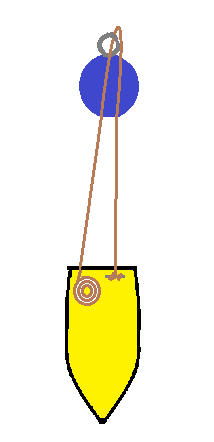
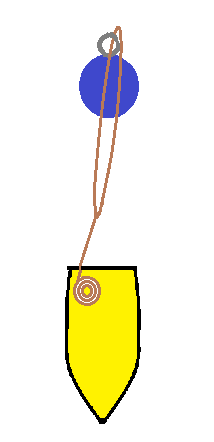
The next trip I decided to cleat both sides of the line, and tie the knot behind the cleats. If you want to try this
I strongly encourage you to practice it a couple of times while on the dock before you leave. The last thing you
want to do is end up with a stantion or forestay inside the bowline loop! The first time I simulated this to show
a crew member what it would entail, I made an invalid assumption about what would leave it free and clear.
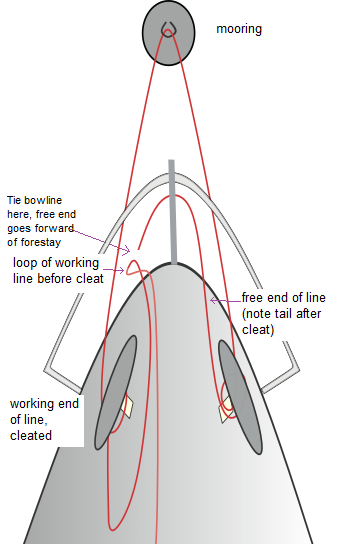
A crude diagram is provided at right. A couple of notes, you'll need to leave 6-8' of free line tailing the first
cleat (starboard in this diagram) and that free line must be led foreward of the forestay. Both the free tail and the standing loop run right back out
the same ways the lines to the buoy came in through the bow pulpit, and all must be led forward of the forestay. Once you have
both sides cleated the helmsman can use motor force against the line to keep a safe distance while the knot is being tied,
all load is temporarily borne between the cleats and the buoy.
When the bowline is tied both can be uncleated. If done properly the loop will be free and clear of your boat and you'll have
plenty of left-over standing line to play out. If not done properly, you'll be in a tight spot, if conditions are strong,
cutting the line might be the only rational option. I cannot stress enough the
need to practice this at the dock!
When the weather is different...
When conditions are pulling your boat away from the island, as
happens during certain tidal phases and/or wind conditions, I find it easier to back down to the stern buoy first,
get a line through the eye, then proceed to the buoy on your bow. Same principle, different order. But this
may be just personal preference. Either approach avoids trying to fight physics, the bow is allowed to go where
the weather wants to take it.
And when conditions are pulling you across the moorings, be careful not to get blown
too close to other boats! Control the bow by getting a line on it first, then steer your stern high, towards the direction
of the forces, in anticipation of being dragged down. If you end up getting blown past the buoy, motor back to the first
buoy, taking up the slack line as you go, and try again -- you'll never make it back up with prop walk or other excessive
force, so don't even try, just motor back to where you started and give it another go. There ain't no shame in a do-over,
it'll get you way more respect than trying to thrash your way back.
Small world...This page was largely inspired by a power boat trying to moor, with its bow and my
stern tied to the same buoy. She tried to get it done with power -- a LOT of power, and yanked us around a fair bit. I tried
to offer some instructive help to the lady skipper, but she couldn't hear well enough over her engines. Luckily she knew someone
on Angel Island, and he helped her pick them up. Hats off to her for seeking assistance when she needed it. (A lot of skippers
I know would be too stubborn to do so.) A few months after that, another sailboat that was there to witness the drama, moved to
the slip across from ours. We shared a good laugh. (Gotta love the marina community!)
Choosing lines
The distance between buoys varies between roughly 80' to 120'. You'll need two lines, one long
enough to stay tied to one buoy while you motor to reach the other. The other only needs to be about half
as long as the first. (The length of your boat counts towards this distance.) You'll want at least 225' of line,
unless you use the "bowline" alternative discussed above, in which case 150' should be enough to use any buoy pair.
The second line should be about half the length of the first. Use a thickness comparable to your normal dock lines or
anchor line.
Practical notes...
You can safely drag a line astern while going forward -- fishermen do it all the time! The place on the boat
at which the line is affixed (hands count) must be aft of the propeller, no slack line can be drifting under or near
the boat and you must not shift into reverse while the line is dragging. Given those conditions a line trailing
astern is safe enough to haul in while you are moving.
For reasons that should be obvious, a line trailing from the bow is very dangerous when going forward -- it doesn't
meet the conditions (not affixed aft of the prop.) Logically, by the same token, you can safely back a boat with bow
line in the water, just do not shift into forward until the line is all the way out.
Good luck, fair winds, godspeed!
Donation Guide
Pre-arrival: $1
If you're in Ayala Cove as you read this and...
...you're looking at the moorings wondering what the hell: $5
...you've already tried to pick up a mooring, but failed: $10
...you're tied to only one mooring buoy right now, using a dock line: $15
...people on other boats are watching you: $20
(Or any amount you may be kind enough to contribute.)
